File Management is one of the most common tasks that is performed on the command line, and offers a more direct and efficient way to navigate, create, and manipulate files and directories using simple commands like ls, cd, cp, mv, and rm. Learning these commands helps users understand how file systems work, builds confidence in handling system tasks, and enables automation through scripting, making it faster and more efficient than relying on a graphical interface.
While this is not an exhaustive list of commands for managing files it will certainly provide you with a good starting point and make your Linux journey a bit easier.
1. ls: The ls command in Linux is used to list the contents of a directory. It displays files, directories, and their attributes, providing various options to modify how the information is presented, such as including file permissions, sizes, modification times, and more.

The ls command, as seen above, will list contents of the current directory. Above we can see all of the contents of the root directory.

There are also hidden files (shown below with the . before the filename) on the file system that will not show with just the basic ls command. To view these hidden files you will need to use the -a flag after the ls command.
2. cd: The cd (change directory) command in Linux is used to navigate between directories in the filesystem. It allows users to move to different directories by specifying a path, making it a fundamental tool for filesystem navigation and management. To move forwards through you will need to type in cd followed by the directory you are wanting to move into. (This can be used after the ls command)

In the above example, we show all of the directories in our current location. We want to move into the var directory so we type in cd var. Once you have moved into the directory it will now be added to the directory path.
To move backwards we will need to type in ../ This tells the system that we need to move backwards one directory. This can be chained any number of times to go back multiple directories.
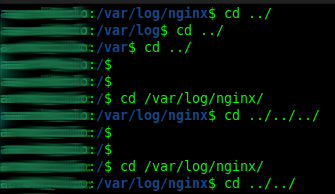
The above shows a few different methods to use the cd command. The first shows moving backwards from the /var/log/nginx directory one at a time. First we go back to the /var/log/ and then to the /var directory.
Next, you can also chain moving forwards through the system by appending the next directory. Here you can see we move from the root directory back to the /var/log/nginx directory.
The next cd command chains together 3 of the ../ to bring us all the way back to the root directory. The last entry we have omitted the directory where we will end up in. Can you guess which one? If you guessed the /var directory then you are correct. That last command will take us back 2 directories from the current location.

In the above you can see that we started out in the /var/log directory. (This is to show the directory we will be moving into) Next we change into the nginx directory. Next we tell the system to move back one directory putting us in the /var/log directory. From the ls command we ran at the start we know that there is a directory named apt located in the /var/log directory. Now we append apt after the ../ and that will put us in the intended directory.
3. pwd: The pwd (print working directory) command in Linux is used to display the full path of the current directory in which the user is working. It is a simple but essential command for navigating the filesystem, as it tells you exactly where you are within the directory structure.

Some systems are not configured to show the full directory path on the command line. This is to make it easier to read when you are working several directories deep on the system. In the event you get lost or want to know what you working directory is, you can run the pwd command and this will provide you with the full directory output as seen above.
4. df: The df command in Linux is used to display information about disk space usage on the file systems mounted on the system. It provides a summary of the total, used, and available space for each file system, along with details like the file system name and mount point. This command is useful for monitoring disk space usage and ensuring that sufficient space is available on your drives.
There might be a situation when using Linux that you may want to determine the amount of space consumed by a certain file, or determine how much space is left on a particular file system.
Below we can see the output of using the base df command with no flags being used. We see the different file systems available to us as well as their current usage, available space, and where they are mounted.

By default the output is shown in KB. To make this human readable we will use the -h flag to display everything in kilobytes, megabytes, gigabytes and so on.

5. touch: The touch command in Linux is primarily used to create empty files or update the timestamps of existing files. It is a simple but essential tool for file management, allowing users to generate new files or modify the access and modification times of files without altering their content.
As seen below we will use the touch command followed by the name of the file and file type.

After the command is run we see that there is now a test.txt file created in the local directory. This can also be chained, similar to the cd command, if you wanted to create a file in a directory that isn’t the current working directory.
Now that we have the test.txt file created, using the ls command with the -lh flags we can see the timestamp for the file. Below we see that the file was created at 16:57. If we run the touch command on the same file we can see that the timestamp was updated to 16:58.

6. mkdir: The mkdir (make directory) command in Linux is used to create new directories (folders) within the filesystem. It allows users to create one or more directories and supports various options to control how directories are created, including permissions and creating parent directories as needed.

You can also use the mkdir command to create multiple directories at once. Below you will see an example where we create dir1 dir2 and dir3 all in the same command string.

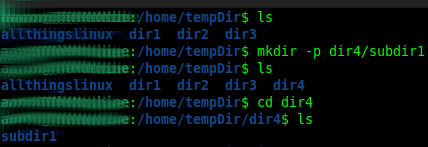
If you are needing to create a directory structure, you can use the -p flag which will create a top-level directory (if it doesn’t already exist), and then the subsequent child directory. You can see an example of this below where we create dir4. If we navigate into that directory we can also see that subdir1 was created inside.
You can also provide in a full path using the example command below:
mkdir -p /path/to/parent/directory/new_directory
7. mv: The mv command in Linux is used to move or rename files and directories. It serves two primary functions: moving files or directories from one location to another and renaming files or directories. The command can also overwrite existing files, if specified.
Using commands we have shown already, we can navigate (cd) into one of the existing directories, and use the touch command to create a new file named “test.txt”

Now we can see the test.txt file listed, but its not very descriptive so we can use the mv command to change the name of the file.

8. rm: The rm command in Linux is used to remove (delete) files and directories from the filesystem. It is a powerful tool that permanently deletes data without moving it to a recycle bin, so caution is advised, especially when using certain options like -r and -f. The rm command allows users to delete individual files, multiple files, and even entire directories recursively.

You can string a list of different files in the same command to have them all removed at the same time.

Below we see the -rf flags being used to remove a directory. Combine the -r and -f options to forcefully remove a directory and its contents without confirmation.

You can use the -i flag which will prompt you for confirmation before the file is deleted.

9. cp: The cp command in Linux is used to copy files and directories from one location to another. It is a versatile command that allows users to duplicate data within the file system, preserving or modifying attributes as needed. The cp command can handle a variety of use cases, including copying single or multiple files, entire directories, and even preserving file attributes during the copy process.
Below is an example of how to use the cp command to make a copy of a file, copyme.txt, inside of another directory.

If needed, you could make copies of all files of a certain file type, in the below example .txt, by using the wildcard *.txt and specifying the new directory.

You can also copy directories, and all of the contents, from one location to another. In the below example you can see that we are making a copy of dir2 with all of its contents inside of dir3.

10. find: The find command in Linux is used to search for files and directories within a specified directory hierarchy based on various criteria. It provides a powerful way to locate files based on attributes like name, type, size, modification date, and more.
Below is an example of searching for files with a given name. It will return all of the different locations and their full directory paths:

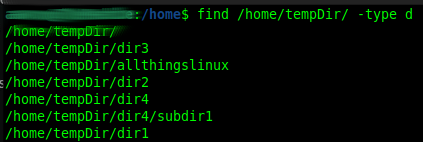
If you want to locate a specific directory along with all its subdirectories, you can use the -type d flag, which stands for “directory.” This will return a list of all directories from the top level down.
Another example would be to locate a file based on the type. In the below we are searching the tempDir for any files that have the .txt file type. You can use any different filetype by using the wildcard *

Bonus
man: Displays manual pages for commands.
The man command is by far one of the most useful commands you will ever use. It providers you with the manual page for each command which will list what the command is, what its used for, different flag and options on how to use the command, etc. To access the man page you will type man followed by the command name. (e.g man ls)
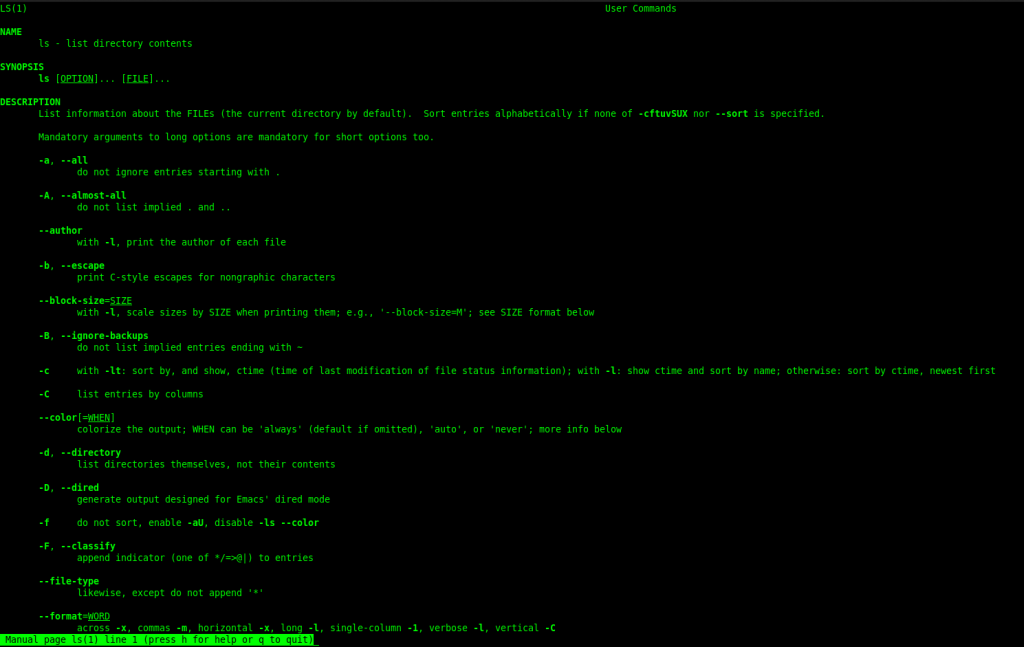
Above you can see the name of the command, the synopses shows how the command is used, and the description explains the purpose of the command and provides a list of the different flags you can use with the command(s). Going back to the ls command we used earlier we can see on this man page that the -a or –all flag will show all entries in a directory including the . hidden files. If you are ever stuck or unsure of a command its always a good idea to read through the man page

